We have two Linux hosts of Oracle RAC in Oracle VirtualBox. Due to space shortage for file systems, there are difficulties for GI/RAC upgrading and patching. we have to extend the virtual hard disk from 30GB to 45GB, then extend the file system size accordingly.
Finally we need add 15GB into root (/) file system.
[root@racnode1]# df -h
Filesystem          Size  Used Avail Use% Mounted on
/dev/mapper/ol-root  27G   17G   11G 63%  /
devtmpfs            2.8G    0   2.8G  0%  /dev
...
..
.
Before we start, we need know a lit of LVM terms.

PV = Physical Volume. When you add a new disk or new partition, you need to designate it as a PV so it can be used by the LVM VG = Volume Group. This is a group of PVs.
LV = Logical Volume. This is an abstraction of disk space carved out from a Volume Group (VG) which the OS can then use just as it would a regular hard drive
PE = Physical Extents. Think of this like “blocks”. When you do a “vgdisplay” you will see the PE size , the total number of PE’s in the VG and the free PEs available.
Backup virtual hard disk for racnode1 and racnode2, in case the operation fails

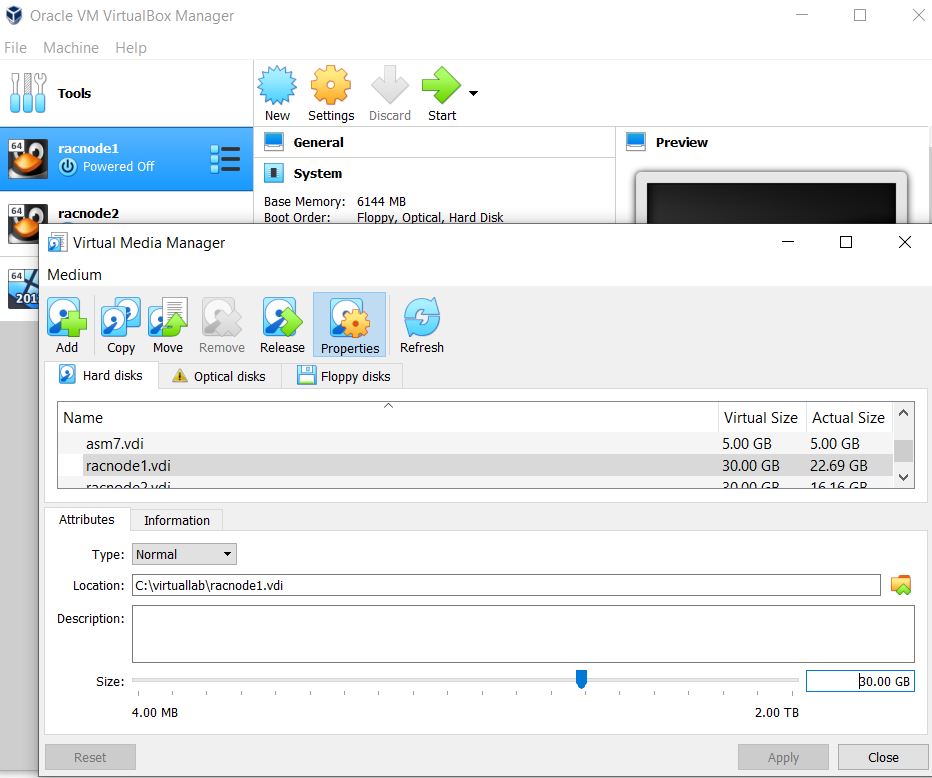
Increase Virtualbox Disk Size
Make it from original 30GB to new value 45GB, and reboot the virtual machine.
Identify the partition type
[root@racnode1]# fdisk -l

Disk /dev/sda: 32.2 GB, 32212254720 bytes, 62914560 sectors
Units = sectors of 1 * 512 = 512 bytes
Sector size (logical/physical): 512 bytes / 512 bytes
I/O size (minimum/optimal): 512 bytes / 512 bytes
Disk label type: dos
Disk identifier: 0x000928d8

Device    Boot  Start    End    Blocks  Id   System
/dev/sda1 *      2048  1026047  512000  83    Linux
/dev/sda2     1026048 62914559 30944256 8e Linux LVM
Remember the partition ID is 8e, and System is “Linux LVM”
Check PV information
[root@racnode1]# pvdisplay
--- Physical volume ---
PV Name /dev/sda2
VG Name ol
PV Size 29.51 GiB / not usable 3.00 MiB
Allocatable yes
PE Size 4.00 MiB
Total PE 7554
Free PE 10
Allocated PE 7544
PV UUID ifffmk-GSXU-NcKC-vww1-HMF6-Nc36-A6sewK
Partition the new disk space
[root@racnode1 ~]# fdisk /dev/sda
Welcome to fdisk (util-linux 2.23.2).

Changes will remain in memory only, until you decide to write them.
Be careful before using the write command.

Command (m for help): p

Disk /dev/sda: 48.3 GB, 48318382080 bytes, 94371840 sectors
Units = sectors of 1 * 512 = 512 bytes
Sector size (logical/physical): 512 bytes / 512 bytes
I/O size (minimum/optimal): 512 bytes / 512 bytes
Disk label type: dos
Disk identifier: 0x000928d8

Device Boot Start End Blocks Id System
/dev/sda1 * 2048 1026047 512000 83 Linux
/dev/sda2 1026048 62914559 30944256 8e Linux LVM

Command (m for help): n
Partition type:
p primary (2 primary, 0 extended, 2 free)
e extended
Select (default p): p
Partition number (3,4, default 3):
First sector (62914560-94371839, default 62914560):
Using default value 62914560
Last sector, +sectors or +size{K,M,G} (62914560-94371839, default 94371839):
Using default value 94371839
Partition 3 of type Linux and of size 15 GiB is set

Command (m for help): p

Disk /dev/sda: 48.3 GB, 48318382080 bytes, 94371840 sectors
Units = sectors of 1 * 512 = 512 bytes
Sector size (logical/physical): 512 bytes / 512 bytes
I/O size (minimum/optimal): 512 bytes / 512 bytes
Disk label type: dos
Disk identifier: 0x000928d8

Device Boot Start End Blocks Id System
/dev/sda1 * 2048 1026047 512000 83 Linux
/dev/sda2 1026048 62914559 30944256 8e Linux LVM
/dev/sda3 62914560 94371839 15728640 83 Linux

Command (m for help): m
Command action
   a   toggle a bootable flag
   b   edit bsd disklabel
   c   toggle the dos compatibility flag
   d   delete a partition
   g   create a new empty GPT partition table
   G   create an IRIX (SGI) partition table
   l   list known partition types
   m   print this menu
   n   add a new partition
   o   create a new empty DOS partition table
   p   print the partition table
   q   quit without saving changes
   s   create a new empty Sun disklabel
   t   change a partition's system id
   u   change display/entry units
   v   verify the partition table
   w   write table to disk and exit
   x   extra functionality (experts only)

Command (m for help): t
Partition number (1-3, default 3):
Hex code (type L to list all codes): L

 0  Empty           24  NEC DOS         81  Minix / old Lin bf  Solaris
 1  FAT12           27  Hidden NTFS Win 82  Linux swap / So c1  DRDOS/sec (FAT-
 2  XENIX root      39  Plan 9          83  Linux           c4  DRDOS/sec (FAT-
 3  XENIX usr       3c  PartitionMagic  84  OS/2 hidden C:  c6  DRDOS/sec (FAT-
 4  FAT16 <32M      40  Venix 80286     85  Linux extended  c7  Syrinx
 5  Extended        41  PPC PReP Boot   86  NTFS volume set da  Non-FS data
 6  FAT16           42  SFS             87  NTFS volume set db  CP/M / CTOS / .
 7  HPFS/NTFS/exFAT 4d  QNX4.x          88  Linux plaintext de  Dell Utility
 8  AIX             4e  QNX4.x 2nd part 8e  Linux LVM       df  BootIt
 9  AIX bootable    4f  QNX4.x 3rd part 93  Amoeba          e1  DOS access
 a  OS/2 Boot Manag 50  OnTrack DM      94  Amoeba BBT      e3  DOS R/O
 b  W95 FAT32       51  OnTrack DM6 Aux 9f  BSD/OS          e4  SpeedStor
 c  W95 FAT32 (LBA) 52  CP/M            a0  IBM Thinkpad hi eb  BeOS fs
 e  W95 FAT16 (LBA) 53  OnTrack DM6 Aux a5  FreeBSD         ee  GPT
 f  W95 Ext'd (LBA) 54  OnTrackDM6      a6  OpenBSD         ef  EFI (FAT-12/16/
10  OPUS            55  EZ-Drive        a7  NeXTSTEP        f0  Linux/PA-RISC b
11  Hidden FAT12    56  Golden Bow      a8  Darwin UFS      f1  SpeedStor
12  Compaq diagnost 5c  Priam Edisk     a9  NetBSD          f4  SpeedStor
14  Hidden FAT16 ❤ 61  SpeedStor       ab  Darwin boot     f2  DOS secondary
16  Hidden FAT16    63  GNU HURD or Sys af  HFS / HFS+      fb  VMware VMFS
17  Hidden HPFS/NTF 64  Novell Netware  b7  BSDI fs         fc  VMware VMKCORE
18  AST SmartSleep  65  Novell Netware  b8  BSDI swap       fd  Linux raid auto
1b  Hidden W95 FAT3 70  DiskSecure Mult bb  Boot Wizard hid fe  LANstep
1c  Hidden W95 FAT3 75  PC/IX           be  Solaris boot    ff  BBT
1e  Hidden W95 FAT1 80  Old Minix
Hex code (type L to list all codes): 8e
Changed type of partition 'Linux' to 'Linux LVM'

Command (m for help): p

Disk /dev/sda: 48.3 GB, 48318382080 bytes, 94371840 sectors
Units = sectors of 1 * 512 = 512 bytes
Sector size (logical/physical): 512 bytes / 512 bytes
I/O size (minimum/optimal): 512 bytes / 512 bytes
Disk label type: dos
Disk identifier: 0x000928d8

   Device Boot      Start         End      Blocks   Id  System
/dev/sda1   *        2048     1026047      512000   83  Linux
/dev/sda2         1026048    62914559    30944256   8e  Linux LVM
/dev/sda3        62914560    94371839    15728640   8e  Linux LVM

Command (m for help): w
The partition table has been altered!

Calling ioctl() to re-read partition table.

WARNING: Re-reading the partition table failed with error 16: Device or resource busy.
The kernel still uses the old table. The new table will be used at
the next reboot or after you run partprobe(8) or kpartx(8)
Syncing disks.

[root@racnode1 ~]# reboot
PolicyKit daemon disconnected from the bus.
We are no longer a registered authentication agent.
Check partitions
[root@racnode1 ~]# fdisk -l

Disk /dev/sda: 48.3 GB, 48318382080 bytes, 94371840 sectors
Units = sectors of 1 * 512 = 512 bytes
Sector size (logical/physical): 512 bytes / 512 bytes
I/O size (minimum/optimal): 512 bytes / 512 bytes
Disk label type: dos
Disk identifier: 0x000928d8

Device Boot Start End Blocks Id System
/dev/sda1 * 2048 1026047 512000 83 Linux
/dev/sda2 1026048 62914559 30944256 8e Linux LVM
/dev/sda3 62914560 94371839 15728640 8e Linux LVM
pvcreate to add the new partition as a PV for VG
[root@racnode1 ~]# pvcreate /dev/sda3
WARNING: dos signature detected on /dev/sda3 at offset 510. Wipe it? [y/n]: y
Wiping dos signature on /dev/sda3.
Physical volume "/dev/sda3" successfully created
Check partition type, system, or need reboot the virtual machine if below errors occurred.
[root@racnode1 ~]# pvcreate /dev/sda3
  Device /dev/sda3 not found (or ignored by filtering).
Check PV to make sure new PV added
[root@racnode1 ~]# pvdisplay
--- Physical volume ---
PV Name /dev/sda2
VG Name ol
PV Size 29.51 GiB / not usable 3.00 MiB
Allocatable yes
PE Size 4.00 MiB
Total PE 7554
Free PE 10
Allocated PE 7544
PV UUID ifffmk-GSXU-NcKC-vww1-HMF6-Nc36-A6sewK

"/dev/sda3" is a new physical volume of "15.00 GiB"
--- NEW Physical volume ---
PV Name /dev/sda3
VG Name
PV Size 15.00 GiB
Allocatable NO
PE Size 0
Total PE 0
Free PE 0
Allocated PE 0
PV UUID WGBbzt-fFtD-ecMK-gJyu-RgtJ-9LeR-DKPfJK
Find the VG name details for adding the new PV
[root@racnode1 ~]# vgdisplay
--- Volume group ---
VG Name ol
System ID
Format lvm2
Metadata Areas 1
Metadata Sequence No 3
VG Access read/write
VG Status resizable
MAX LV 0
Cur LV 2
Open LV 2
Max PV 0
Cur PV 1
Act PV 1
VG Size 29.51 GiB
PE Size 4.00 MiB
Total PE 7554
Alloc PE / Size 7544 / 29.47 GiB
Free PE / Size 10 / 40.00 MiB
VG UUID 55lr8l-8d38-GGIX-j0Cm-InKP-Jiyb-refLmt
Add the new PV to the volume group ( ‘ol’)
[root@racnode1 ~]# vgextend ol /dev/sda3
Volume group "ol" successfully extended
[root@racnode1 ~]#
Check the new size of the VG
[root@racnode1 ~]# vgdisplay
--- Volume group ---
VG Name ol
System ID
Format lvm2
Metadata Areas 2
Metadata Sequence No 4
VG Access read/write
VG Status resizable
MAX LV 0
Cur LV 2
Open LV 2
Max PV 0
Cur PV 2
Act PV 2
VG Size 44.50 GiB
PE Size 4.00 MiB
Total PE 11393
Alloc PE / Size 7544 / 29.47 GiB
Free PE / Size 3849 / 15.04 GiB
VG UUID 55lr8l-8d38-GGIX-j0Cm-InKP-Jiyb-refLmt
Which LV to extend ?
here is ‘/dev/ol/root’
[root@racnode1 ~]# lvdisplay
--- Logical volume ---
LV Path /dev/ol/swap
LV Name swap
VG Name ol
LV UUID epJhR9-0sM6-bK6L-qubv-lrJb-0P0X-2Ab5fD
LV Write Access read/write
LV Creation host, time localhost.localdomain, 2015-11-24 00:34:14 +1100
LV Status available
# open 2
LV Size 3.00 GiB
Current LE 768
Segments 1
Allocation inherit
Read ahead sectors auto
- currently set to 8192
Block device 252:1

--- Logical volume ---
LV Path /dev/ol/root
LV Name root
VG Name ol
LV UUID N0D1Hr-FbhE-R7rt-WuUX-9PQU-jVfH-eF5UtL
LV Write Access read/write
LV Creation host, time localhost.localdomain, 2015-11-24 00:34:14 +1100
LV Status available
# open 1
LV Size 26.47 GiB
Current LE 6776
Segments 1
Allocation inherit
Read ahead sectors auto
- currently set to 8192
Block device 252:0
Extend the LV
Make sure +3849 is from ‘vgdisplay” Free PE
...
.
Alloc PE / Size 7544 / 29.47 GiB
Free PE / Size 3849 / 15.04 GiB
...
.
[root@racnode1 ~]# lvextend -l +3849 /dev/ol/root
Size of logical volume ol/root changed from 26.47 GiB (6776 extents) to 41.50 GiB (10625 extents).
Logical volume root successfully resized.
[root@racnode1 ~]#
Shows the new LV size
[root@racnode1 ~]# lvdisplay
--- Logical volume ---
LV Path /dev/ol/swap
LV Name swap
VG Name ol
LV UUID epJhR9-0sM6-bK6L-qubv-lrJb-0P0X-2Ab5fD
LV Write Access read/write
LV Creation host, time localhost.localdomain, 2015-11-24 00:34:14 +1100
LV Status available
# open 2
LV Size 3.00 GiB
Current LE 768
Segments 1
Allocation inherit
Read ahead sectors auto
- currently set to 8192
Block device 252:1

--- Logical volume ---
LV Path /dev/ol/root
LV Name root
VG Name ol
LV UUID N0D1Hr-FbhE-R7rt-WuUX-9PQU-jVfH-eF5UtL
LV Write Access read/write
LV Creation host, time localhost.localdomain, 2015-11-24 00:34:14 +1100
LV Status available
# open 1
LV Size 41.50 GiB
Current LE 10625
Segments 2
Allocation inherit
Read ahead sectors auto
- currently set to 8192
Block device 252:0
Finally extend the file system size
As default, RedHat/CentOS 7 uses xfs_growfs to extend XFS file system. Alternatively using the resize2fs command for ext based file systems.
[root@racnode1 ~]# cat /etc/fstab

#
# /etc/fstab

# Created by anaconda on Mon Nov 23 08:34:14 2015
#
# Accessible filesystems, by reference, are maintained under '/dev/disk'
# See man pages fstab(5), findfs(8), mount(8) and/or blkid(8) for more info
#
/dev/mapper/ol-root / xfs defaults 0 0
UUID=fc21c76e-90ae-4d7f-9b1a-52412af3cf78 /boot xfs defaults 0 0
/dev/mapper/ol-swap swap swap defaults 0 0
tmpfs /dev/shm tmpfs size=2g 0 0
[root@racnode1 ~]#
[root@racnode1 ~]# xfs_growfs /dev/ol/root
meta-data=/dev/mapper/ol-root isize=256 agcount=4, agsize=1734656 blks
= sectsz=512 attr=2, projid32bit=1
= crc=0 finobt=0
data = bsize=4096 blocks=6938624, imaxpct=25
= sunit=0 swidth=0 blks
naming =version 2 bsize=4096 ascii-ci=0 ftype=0
log =internal bsize=4096 blocks=3388, version=2
= sectsz=512 sunit=0 blks, lazy-count=1
realtime =none extsz=4096 blocks=0, rtextents=0
data blocks changed from 6938624 to 10880000
For newer Linux version, if below errors occurred:
[root@racnode1 ~]# xfs_growfs /dev/ol/root
xfs_growfs: /dev/ol/root is not a mounted XFS filesystem
Then :
[root@racnode1 ~]#  xfs_growfs /
meta-data=/dev/mapper/ol-root   isize=256    agcount=4, agsize=1734656 blks
         =                      sectsz=512   attr=2, projid32bit=1
         =                      crc=0        finobt=0 spinodes=0 rmapbt=0
         =                      reflink=0
data     =                      bsize=4096   blocks=6938624, imaxpct=25
         =                      sunit=0      swidth=0 blks
naming   =version 2             bsize=4096   ascii-ci=0 ftype=0
log      =internal              bsize=4096   blocks=3388, version=2
         =                      sectsz=512   sunit=0 blks, lazy-count=1
realtime =none                  extsz=4096   blocks=0, rtextents=0
data blocks changed from 6938624 to 10880000
[root@racnode1 ~]# df -h
Filesystem           Size Used Avail Use% Mounted on
/dev/mapper/ol-root   42G  17G   26G  40%    /
devtmpfs             2.8G    0  2.8G   0%   /dev
...
..
.
So below are all the commands used
# df -h
To see the current disk usage.
# fdisk -l
To see the current partitions details.
# poweroff
Turn the VM off so we can extend the disk on the VM side.
# fdisk -l
To see the new disk size on /dev/sda which we just extended, or to see new disks we just presented (/dev/sdb, /dev/sdc, etc.)
# fdisk /dev/sda
To create new partitions for the OS to use. These new partitions will be added to the VG so we can extend the LV that the “/” partition is on. My newly created partition in the example is /dev/sda3. For new disks you would use /dev/sdb, or /dev/sdc. If you are using an extended /dev/sda like in my case, you will need to reboot for the changes to be seen
# fdisk -l
To see the new partitions
# pvdisplay
View current physical volumes a.k.a. pv
# pvcreate /dev/sda3
Allow Linux OS to use the new partition in LVM
# pvdisplay
See the new pv /dev/sda3
# vgdisplay
View the current volume groups
# vgextend vg_ol /dev/sda3
Add the new PV /dev/sda3 to the existing VG ol
# vgdisplay
Now you can see the new size of the VG ol. Note the new amount of free PE’s (physical extents)
# lvdisplay
View the current LV. In this situation, which is the root partition
# lvextend -l +2559 /dev/ol/root
Now make the LV larger. Growing the LV /dev/ol/root by 3849 PEs
# lvdisplay
Now you can see the larger size of the LV
#xfs_growfs /dev/ol/root
or
# xfs_growfs /dev/ol/root
Online resize of the actual filesystem now on that LV
# df -h
You can see the new size now using the “df” command