RMAN-06004: Oracle error from recovery catalog database: RMAN-20005: target database name is ambiguous

The following errors occur in the trace file when duplicate a database:

MAN-00571: ===========================================================
RMAN-00569: =============== ERROR MESSAGE STACK FOLLOWS ===============
RMAN-00571: ===========================================================
RMAN-03002: failure of Duplicate Db command at 05/13/2025 21:01:07
RMAN-05501: aborting duplication of target database
RMAN-06004: Oracle error from recovery catalog database: RMAN-20005: target database name is ambiguous
DBGMISC: ENTERED krmkursr [21:01:13.976]
DBGMISC: EXITED krmkursr [21:01:13.976] elapsed time [00:00:00:00.000]
-------------------------------------------------------------------------------
Trace Bucket Dump End: rman trace

RESOLUTION

If the source database is still running, the run the following the sql to get the dbid:

SQL>  select dbid, name from v$database;

DBID NAME
---------- ---------
1234567890 TESTDB

Otherwise logon to RMAN catalog database, and

SQL>select rbs.db_key
, rd.name
, RBS.DB_ID
, rbs.bs_key
, rbs.recid
, rbs.stamp
, rbs.backup_type
, rbs.start_time, status
from rc_backup_set rbs, rc_database rd
where rbs.db_key=rd.db_key
and rbs.db_id=rd.dbid
and rd.name='TESTDB' ;

DB_KEY NAME DB_ID BS_KEY RECID STAMP B START_TIM S
---------- -------- ---------- ---------- ---------- ---------- - ---------
86602789 TESTDB 1234567890 104349946 5934 1201017848 L 13-MAY-25 A

Finally, in RMAN script add the following:

set dbid=1234567890;
duplicate database from testdb to devdb until time "TO_DATE('2025-05-05 09:00:00','YYYY-MM-DD HH24:MI:SS'

Datapatch: Unsupported named object type for bind parameter error

While running “datapatch -verbose”, the following errors occur:

$ ./datapatch -verbose
...
..
.


Unsupported named object type for bind parameter at /u01/app/oracle/product/19.0.0/dbhome_1/sqlpatch/sqlpatch.pm line 5827.


Please refer to MOS Note 1609718.1 and/or the invocation log
/u01/app/oracle/cfgtoollogs/sqlpatch/sqlpatch_52411_2025_01_01_10_37_20/sqlpatch_invocation.log
for information on how to resolve the above errors.

Check line 5827 of file “/u01/app/oracle/product/19.0.0/dbhome_1/sqlpatch/sqlpatch.pm”:

5827 $patch_metadata_stmt->bind_param(":patch_descriptor", $descriptor, {ora_type => ORA_XMLTYPE});

SOLUTION

Subscribe to get access

Read more of this content when you subscribe today.

How to Discover Autonomous Database in Oracle Enterprise Manager (OEM)

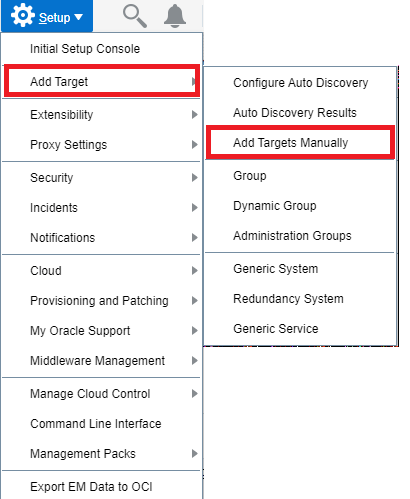
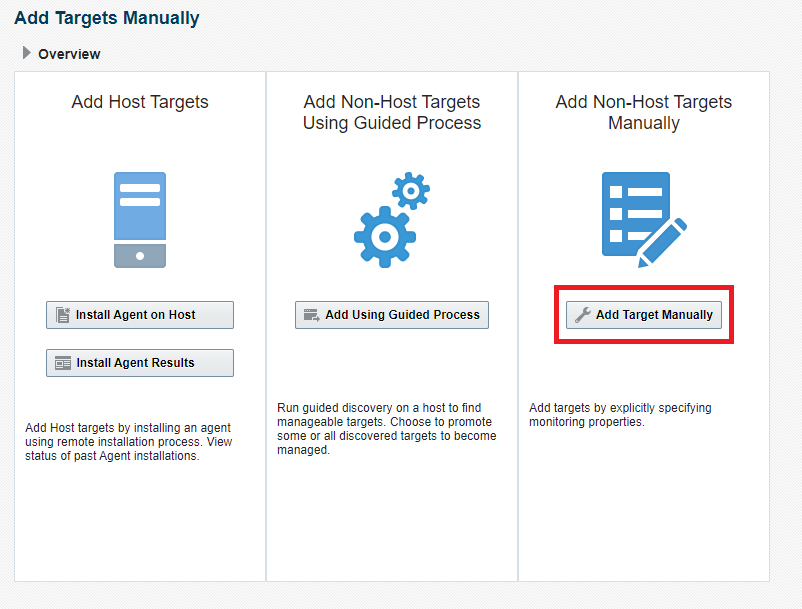
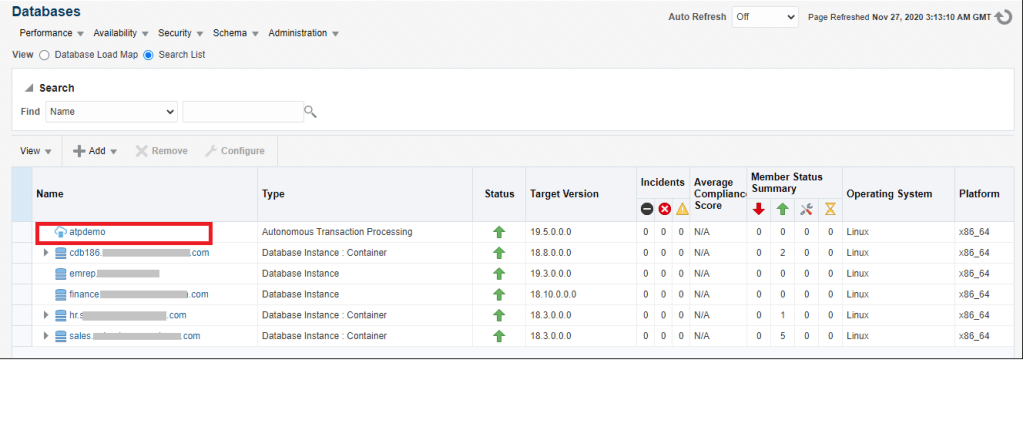
This post demonstrate how to discover your Autonomous Database in OEM.

Here EM Agent on OMS (Oracle Management Service ) is used to remotely monitor the Autonomous Database ( ADB ).

Prerequisites

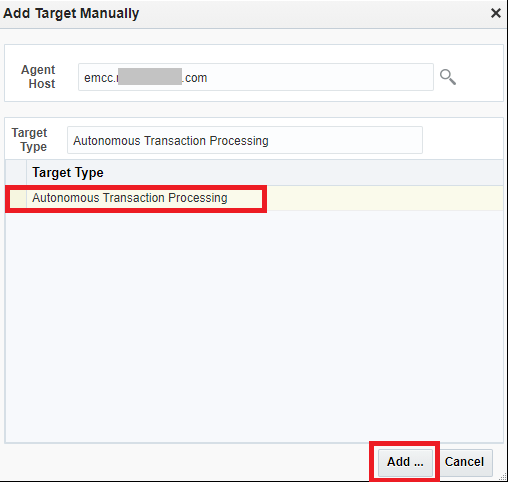
1. In this example an ADW will be discovered and monitored by the on-premise OEM by using OMS central agent for convenience .

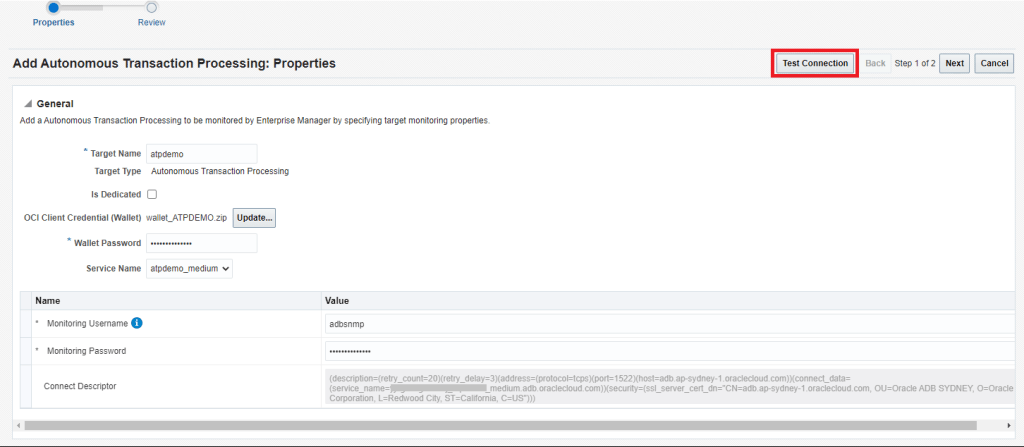
2. Connect to the Autonomous Database (via Database Actions or SQL Developer) and unlock ADBSNMP user account.

SQL> alter user adbsnmp identified by "<password>" account unlock;

3. Check adbsnmp user and grant additional privileges required for ADB monitoring to the ADB_MONITOR role and then grant to ADBSNMP user, if not yet.

SQL> grant create session,select_catalog_role,select any dictionary to ADB_MONITOR;
SQL> grant ADB_MONITOR to adbsnmp;

4. Download Client Credential Wallet from Autonomous Database.

5. Configure Network Rules for communication between EM and ADB. 

Network RequirementSourceDestinationPortProtocol
ADBSNMP MonitoringRemote Agent HostAutonomous Database Target1521/1522TCP
Upload to EMRemote Agent HostOracle Management Service (OMS) Host4903TCP
Comm with AgentOracle Management Service (OMS) HostRemote Agent host3872TCP

Verify from Remote Agent Host that you can access the DB service and EM Upload port:

$ telnet adb 1522
Trying xx.xx.xx.xx
Connected to adb
Escape character is '^]'.


$ telnet oem 4903
Trying xx.xx.xx.xx...
Connected to oem.
Escape character is '^]'.

6. Check for additional requirements for Service Gateway and IAM policies that are required for monitoring Autonomous Database in EM.

https://docs.oracle.com/en/enterprise-manager/cloud-control/enterprise-manager-cloud-control/13.5/emadb/prerequisite-tasks-autonomous-databases-shared.html

7. In OCI Console, create IAM Group eg. EMGroup.

This step is not required here since we make use of on-premise OEM and its central agent.


Allow group EMGroup to manage autonomous-database in compartment <compartment_for_Autonomous_Database>
Allow group EMGroup to read resource-availability in compartment <compartment_for_Autonomous_Database>
Allow group EMGroup to read limits in compartment <compartment_for_Autonomous_Database>

Allow group EMGroup to manage orm-stacks in compartment <compartment_for_EM_stack>
Allow group EMGroup to manage instance-family in compartment <compartment_for_EM_stack>
Allow group EMGroup to manage volume-family in compartment <compartment_for_EM_stack>
Allow group EMGroup to manage load-balancers in compartment <compartment_for_EM_stack>
Allow group EMGroup to manage virtual-network-family in compartment <compartment_for_EM_stack>
Allow group EMGroup to manage file-family in compartment <compartment_for_EM_stack>
Allow group EMGroup to manage autonomous-database-family in compartment <compartment_for_EM_stack>
Allow group EMGroup to manage orm-jobs in compartment <compartment_for_EM_stack>
Allow group EMGroup to read resource-availability in compartment <compartment_for_EM_stack>
Allow group EMGroup to read limits in compartment <compartment_for_EM_stack>

Discover Autonomous Database Target

1. Login to EM Console.

2. Navigate to Setup Add Target > Add Targets Manually

3. Click on Add Target Manually

4. Specify the Agent host that will be remotely monitoring the Autonomous Database.

(In my example, I will be using the EM Agent Host running on my OMS host: emcc.xxx.com, this EM agent can be on any host)

Choose Target Type (eg. Autonomous Transaction Processing)

Click Add

5. Complete the details for the Autonomous Database and then click on Test Connection

  • Target Name
  • Upload the Credential Wallet for the Autonomous Database
  • Wallet Password
  • Service Name
  • Monitoring Username (eg. adbsnmp) and password


Verify Connection is Successful

6. Click on Next

7. Review Details and then click on Submit

8. The target should now be discovered successfully.

9. From EM menu, navigate to TARGETS > DATABASES

10. You should now see the Autonomous Database discovered in the Database Target Page

This completes the discovery of the Autonomous Database in Enterprise Manager.

How to find the PID of the process using a specific port?

# lsof -i :9933
COMMAND PID USER FD TYPE DEVICE SIZE/OFF NODE NAME
oracle_51 51639 oracle 6u IPv4 3233899771 0t0 UDP localhost.localdomain:9933
# netstat -nlp|grep 9933
udp 1053952 0 127.0.0.1:9933 0.0.0.0:* 51639/oracleTESTDB
# fuser -v -n udp 9933
USER PID ACCESS COMMAND
9933/udp: oracle 51639 F.... oracle_51639_TESTDB

Check Session id(SID) and SQL statement from OS process id(PID) in Oracle

SELECT b.spid,
a.sid,
a.serial#,
a.username,
a.osuser
FROM v$session a, v$process b
WHERE a.paddr = b.addr AND b.spid = '&spid'
ORDER BY b.spid

-- Check SQL statement associated with Process id in Oracle

SELECT RPAD('USERNAME : ' || s.username, 80) ||
RPAD('OSUSER : ' || s.osuser, 80) ||
RPAD('PROGRAM : ' || s.program, 80) ||
RPAD('SPID : ' || p.spid, 80) ||
RPAD('SID : ' || s.sid, 80) ||
RPAD('SERIAL# : ' || s.serial#, 80) ||
RPAD('MACHINE : ' || s.machine, 80) ||
RPAD('TERMINAL : ' || s.terminal, 80)
--RPAD('SQL TEXT : ' || q.sql_text, 80)
FROM v$session s ,v$process p ,v$sql q
WHERE s.paddr = p.addr AND s.sql_address = q.address AND s.sql_hash_value = q.hash_value
AND p.spid = '&spid'