How to Move SQL Database Files to New Location

Move Database Files By SQL Script

1) Get database files details.

SELECT name, physical_name AS NewLocation, state_desc AS OnlineStatus
FROM sys.master_files
WHERE database_id = DB_ID(N'TestDatabase')
GO

2) Run the following SQL script to set a new location for SQL database files.

ALTER DATABASE TestDatabase   
    MODIFY FILE ( NAME = TestDatabase,   
                  FILENAME = 'C:\MSSQLDB\MSSQL15.MSSQLNODE1INST1\UserDB\Data\TestDatabase.mdf');  
GO
 
ALTER DATABASE TestDatabase   
    MODIFY FILE ( NAME = TestDatabase_log,   
                  FILENAME = 'C:\MSSQLDB\MSSQL15.MSSQLNODE1INST1\UserDB\Log\TestDatabase_log.ldf');  
GO

3) Run the following SQL script to take SQL database offline:

ALTER DATABASE TestDatabase SET OFFLINE; 
 GO

4) Move mdf and ldf files to the new location specified in the statement of step2.

5) Now database can be set online by running the following query.

ALTER DATABASE TestDatabase SET ONLINE;  
GO

6) To verify the results by running the following query.

SELECT name, physical_name AS NewLocation, state_desc AS OnlineStatus
FROM sys.master_files
WHERE database_id = DB_ID(N'TestDatabase')
GO

Move Database Files By using Detach and Attach Function

  1. Launch SSMS.
  2. Login to the SQL instance with an account that has the SysAdmin server role.
  3. Navigate to “Databases“.
  4. Right click the database that files to be moved to new location.
  5. Select “Properties“.
  6. In the Properties window, in the Select a Page panel, click “Files“.
  7. Record down the paths and filenames for the database.
  8. Click “OK”.
  9. Right click the same database again.
  10. Select “Tasks “, then click “Detach“.
  11. In the Detach Database window, check the box “Drop Connections“.
  12. Click “OK“.
  13. Launch Windows Explorer.
  14. Browse to the path recorded in step 7.
  15. Move the database’s files to the new location.
  16. Record down the paths where you have just moved the files to.
  17. Return to SSMS again.
  18. Right click “Databases
  19. Select “Attach“.
  20. In the Attach Databases window, click “Add“.
  21. Browse to the path you wrote down in step 16.
  22. Select the .mdf filename for the database.
  23. Click “OK”.
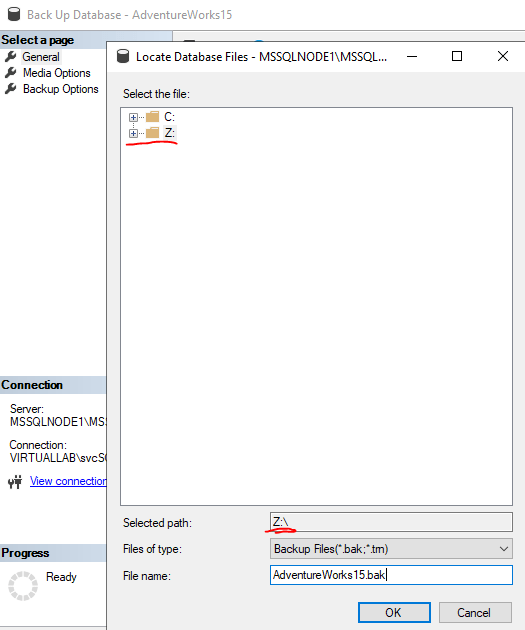
  24. If the other files are not found, click the ellipsis next to the filename that is not found.
  25. In the Locate Database Files window, “browse” to the location of the file for the database that you wrote down in step 16.
  26. Select the file.
  27. Click “OK”.
  28. In the Attach Databases window, click “OK”.
Advertisement

How to Configure SQL Server to Access USB Shared Folder in VirtualBox

In SQL Server Management Studio, you will only see the local drives available to SQL Server database engine. In this article we will take a look at the approach on how to configure SQL Server to access shared folder to perform database backup or restore commands, even further the SQL Server datafiles and logfiles can be stored on to shared folders in Oracle VirtualBox.

Install Guest Additions  

The first thing is to install guest additions if not yet as per following instructions.

Navagite to Devices->Optical Drive->Choose a disk file-> highlight “VboxGuestAdditions” file.
Then click Open.

VirtualBox Guest Addition

Double-click on this CD drive to launch the Oracle VM VirtualBox guest additional setup.

VirtualBox Guest Addition
Start guest additional installation
VirtualBox Guest Addition

Click Next and select the destination folder. It requires approx 1 MB space in the drive.

Destination folder
VirtualBox Guest Addition

In the next step, it shows the components to install.

Select components
VirtualBox Guest Addition

Reboot the VM to complete the guest additional feature for a VM.

Reboot VM
VirtualBox Guest Addition

  Set up VM Shared Folders

VM macine -> Settings->Shared Folders->Add New Shared Folder(+)->Choose Folder Path.

Click OK.

VirtualBox Shared Folder

Go to File Explorer, we can see the following expected network diagram.

Network VBOXSVR of Shared Folder

Enable xp_cmdshell Command in SQL Server

xp_cmdshell is disabled by default. so we need use sp_configure command to enable it as shown below:

EXEC sp_configure 'show advanced options', 1;
GO
RECONFIGURE;
GO

EXEC sp_configure 'xp_cmdshell',1
GO
RECONFIGURE
GO

Define the Share Drive for SQL

Now we need define the shared folder with xp_cmdshell command of SQL server as below:

EXEC XP_CMDSHELL 'net use Z: \VBOXSVR\mssql'

To verify the new drive, we can use the below command that will show you all files in that newly mapped drive:

EXEC XP_CMDSHELL 'Dir Z:' 

To un-map the shared folder drive from SQL server by:

exec xp_cmdShell 'net use Z: /delete'

Test the Shared Folder Drive in SQL Server

Backup Database onto Shared Folder Drive from SSMS

SSMS backup database

SSMS backup database

Backup Database onto Shared Folder Drive by Running SQL Script

BACKUP DATABASE [AdventureWorks15] TO DISK = N'Z:\AdventureWorks15.bak'
WITH NOFORMAT, NOINIT, NAME = N'AdventureWorks15-Full Database Backup',
SKIP, NOREWIND, NOUNLOAD, STATS = 10
GO
10 percent processed.
20 percent processed.
30 percent processed.
40 percent processed.
50 percent processed.
60 percent processed.
70 percent processed.
80 percent processed.
90 percent processed.
Processed 25016 pages for database 'AdventureWorks15', file 'AdventureWorks15' on file 2.
100 percent processed.
Processed 296 pages for database 'AdventureWorks15', file 'AdventureWorks15_log' on file 2.
BACKUP DATABASE successfully processed 25312 pages in 8.847 seconds (22.352 MB/sec).
Completion time: 2020-09-21T18:07:50.3413113+10:00

Create a Database onto Shared Folder Drive

CREATE DATABASE [TestDatabase] ON (NAME = N'TestDatabase', FILENAME = N'Z:\TestDatabase.mdf', SIZE = 512MB, FILEGROWTH = 64MB) LOG ON (NAME = N'TestDatabase_log', FILENAME = N'Z:\TestDatabase_log.ldf', SIZE = 256MB, FILEGROWTH = 32MB) 
GO
Commands completed successfully.
Completion time: 2020-09-21T18:15:32.9791694+10:00

Restore Database onto Shared Folder Drive

Query the logical file names of the database from the previous backup.

RESTORE FILELISTONLY
FROM DISK = 'Z:\AdventureWorks15.bak'

Restore the backup to a new database by using the logicalname column of the previous step.

RESTORE DATABASE AdventureWorks15New
FROM DISK = 'Z:\AdventureWorks15.bak'
WITH MOVE 'AdventureWorks15' TO 'Z:\AdventureWorks15New.mdf',
MOVE 'AdventureWorks15_log' TO 'Z:\AdventureWorks15New_log.ldf'
Processed 25016 pages for database 'AdventureWorks15New', file 'AdventureWorks15' on file 1.
Processed 294 pages for database 'AdventureWorks15New', file 'AdventureWorks15_log' on file 1.
RESTORE DATABASE successfully processed 25310 pages in 5.330 seconds (37.097 MB/sec).
Completion time: 2020-09-21T18:29:04.4634020+10:00

So all works as expected. The shared folder now can be used to store backups, and also datafiles/logfiles of a SQL server.

BSOD/DPC Watchdog Violation Whenever WIFI is Enabled

SYMPTOMS

Every time when wifi is enabled, the PC crashes with BSOD/DPC Watchlog Violation error as below:

Environment:

  • Windows 10 64bit Home Edition.
  • TP-link Archer T4E AC1200 Wireless Dual Band PCI Express Adapter 

After disabled wifi adapter, rebooted the PC successfully without any errors, then tried to enable wifi adapter, system crashed with BSOD screen.

After disabled wifi or set wifi to MANUAL, restarted PC, then PC operated normally while offline.  As soon as connecting PC to wifi, PC froze, then BSOD/DPC WATCHDOG VIOLATION.

The following methods have been tried, but still without luck.

  • Tried restoring from earliest available restore point.
  • Uninstalled driver and installed the driver download from TP-LINK website.
  • Uninstalled driver and installed the driver from original CD.
  • Uninstalled driver, and found only two drivers left. one is from RealTek ( rtwlane.sys) and another driver is Windows native ( vwifibus.sys )
  • Uninstalled device from device manager, then scan device back again.
  • Uninstalled VPN and anti-virus software.

INVESTIGATIONS

Download and install WinDbg

Download and install WinDbg as per Download Debugging Tools for Windows

Run WinDbg

a) Click Start -> All Programs -> Windows Administrative Tool -> Windows Kits ->WinDbg( X64).

b)Select File -> Symbol file path and modify it to suit your situation, then copy and paste it into the box and click OK.

I suggest and use the following as Symbol Path:

SRV*c:\symbols*http://msdl.microsoft.com/download/symbols

c) Select File ->Select Open Crash Dump, and then navigate to the MEMORY.DMP file originated created under C:\Windows, and select Open.

d)Click on ” ! analyze -v

From the above screen, we can see driver “rtwlane.sys” used by “TP-link Archer T4E AC1200 Wireless Dual Band PCI Express Adapter” contributed to the BSOD issue.

For further test, plug another USB Wireless Adaptor, and found it still use the same driver as “rtwlane.sys“, and the result is still same not working.

After a couple of days further testing and investigation, the problem was identified, and resolved by just modifying one configuration, and now connect to wifi without any issues every time. .

SOLUTION

Subscribe to get access

Read more of this content when you subscribe today.

ERROR: Unable to open policy //etc/selinux/targeted/policy/policy.31

When installing Oracle VirtualBox 6.1.4 Guest Addition on Linux, the following errors occur:

# mount /dev/cdrom /media/cdrom
# cd /media/cdrom

# ./VBoxLinuxAdditions.run
Verifying archive integrity… All good.
Uncompressing VirtualBox 6.1.14 Guest Additions for Linux……..
VirtualBox Guest Additions installer
Removing installed version 6.1.4 of VirtualBox Guest Additions…
Copying additional installer modules …
Installing additional modules …
VirtualBox Guest Additions: Starting.
VirtualBox Guest Additions: Building the VirtualBox Guest Additions kernel
modules. This may take a while.
VirtualBox Guest Additions: To build modules for other installed kernels, run
VirtualBox Guest Additions: /sbin/rcvboxadd quicksetup
VirtualBox Guest Additions: or
VirtualBox Guest Additions: /sbin/rcvboxadd quicksetup all
VirtualBox Guest Additions: Building the modules for kernel
4.14.35-1902.10.7.el7uek.x86_64.
ERROR: Can't map '//etc/selinux/targeted/policy/policy.31': Invalid argument
ERROR: Unable to open policy //etc/selinux/targeted/policy/policy.31.
libsemanage.semanage_read_policydb: Error while reading kernel policy from /etc/selinux/targeted/active/policy.kern. (No such file or directory).
OSError: No such file or directory
VirtualBox Guest Additions: Running kernel modules will not be replaced until
the system is restarted

Check ‘//etc/selinux/targeted/policy/policy.31’ file exists but zero size.

#ls -ltr //etc/selinux/targeted/policy/policy.31
-rw-r--r-- 1 root root 0 May 1 6:03 //etc/selinux/targeted/policy/policy.31

SOLUTION

Install the latest package for “selinux-policy-targeted”.

# yum install selinux-policy-targeted

Then run VirtualBox Guest Additions installer successfully.

# ./VBoxLinuxAdditions.run uninstall


# ./VBoxLinuxAdditions.run
Verifying archive integrity… All good.
Uncompressing VirtualBox 6.1.14 Guest Additions for Linux……..
VirtualBox Guest Additions installer
Copying additional installer modules …
Installing additional modules …
VirtualBox Guest Additions: Starting.
VirtualBox Guest Additions: Building the VirtualBox Guest Additions kernel
modules. This may take a while.
VirtualBox Guest Additions: To build modules for other installed kernels, run
VirtualBox Guest Additions: /sbin/rcvboxadd quicksetup
VirtualBox Guest Additions: or
VirtualBox Guest Additions: /sbin/rcvboxadd quicksetup all
VirtualBox Guest Additions: Building the modules for kernel
4.14.35-1902.10.7.el7uek.x86_64.
VirtualBox Guest Additions: Running kernel modules will not be replaced until
the system is restarted

An internal error has occurred at the agent: “java.lang.IllegalStateException: getAgentSubstitutionMap(“cluster.ClusterName”) == null”

While testing a named credential in OEM 13c by following command with errors:

Here “CLU-RACTEST” is the GI cluster name.

$emcli test_named_credential -cred_names="SEC_RACTEST" -target_name="CLU-RACTEST" -target_type="cluster"

An internal error has occurred at the agent: "java.lang.IllegalStateException: getAgentSubstitutionMap("cluster.CLU-RACTEST") == null". Check the agent's error logs for details.

Run “emctl config agent listtargets”, it shows there is no ‘cluster’ target type listed for any of the monitoring agents.

The <AGENT_INST>/sysman/log/gcagent.log showed the below errors.

2020-09-11 14:20:12,572 [631842:5A0FE62C] WARN - target cluster.CLU-RACTEST does not exist
...
..
.
[159979801250001])] ERROR - remote target "cluster.CLU-RACTEST" has NO substitution properties; check that it is properly configured
2020-09-11 14:20:12,573 [631842:HTTP Listener-631842 - /emd/main/ (DispatchRequests OMS.console@17163@oemnode1=>[159979801250001])] ERROR - Critical error:
java.lang.IllegalStateException: getAgentSubstitutionMap("cluster.CLU-RACTEST") == null
at oracle.sysman.gcagent.jobs.JobRequestDriver.substitute(JobRequestDriver.java:2162)
at oracle.sysman.gcagent.jobs.JobRequestDriver.(JobRequestDriver.java:1500)
at oracle.sysman.gcagent.jobs.JobRequestDriver.(JobRequestDriver.java:1529)
at oracle.sysman.gcagent.dispatch.cxl.PerformOperationAction.satisfyRequest(PerformOperationAction.java:130)
...
..
.

SOLUTION

From the OEM Console, go to Cluster homepage -> Target Setup -> Monitoring Configuration.
Click on the Update button (no need to make any other changes).

This will push the cluster target details to the agent side.

Then run “emcli test_named_credential” successfully.

$emcli test_named_credential -cred_names="SEC_RACTEST" -target_name="CLU-RACTEST" -target_type="cluster"

Credentials "SEC_RACTEST:SYSMAN" tested successfully